How to enable data transfer on lenovo. How to set up mobile Internet on an android smartphone? Setting up a Wi-Fi network
? Tablets and smartphones from this manufacturer cannot be classified as highly functional devices, but, nevertheless, we can say with confidence that these devices are ideal for actively communicating on social networks. networks, use mail and various Internet resources. But this naturally requires access to the World Wide Web. In order to freely access the Internet, you can use wi-fi or 3G connection. The material described below will help any user who has problems accessing the Internet to set the desired settings.
Devices from the manufacturer Lenovo use the Android operating system. The settings algorithm is very simple, it does not differ too much from the standard one.
How can I set up an Internet connection on Lenovo via wi-fi?
1. In the settings, you need to open the wi-fi line.
2. This setting must be set to "On".
3. You need to determine which access point you have access to from the list.
4. In the "password" field, select the desired column, and then enter the password.
5. You can activate a free hotspot that is not password protected.
6. The fact that a successful connection to the Internet has taken place can be understood by the appearance on the taskbar of an icon that glows blue.
Using the application or browser, you can freely access the browser.
Internet connection in Lenovo devices via 3G.
The 3G network is a faithful assistant for the successful use of the Internet. To use 3G, you need to purchase a SIM card, which has a special tariff that allows you to use the Internet. As soon as the user inserts this SIM card into the device, the necessary settings for the Internet connection should be installed independently. If this does not happen, a number of operations must be carried out. To get started, make sure that the "data transfer" option is enabled (this option is present in the "Mobile network settings"). The account must have the required amount of funds. Then you can start setting the settings manually.
1. In the settings there is an item "Data transfer" and it is worth using it. In this item there is "mobile network settings" click it, and then "access points".
2. If the required access point is on the list, then you just need to activate it.
3. If there is no such point in the list, then you need to create it. To do this, click "parameters", then "new access point".
4. This is followed by filling in such columns "Name", "Password", "Username", "APN". The necessary data can be easily found on the operator's website, they are present there. Depending on the operator, you need to fill in certain columns, some of them can be left blank.
5. It is necessary to check the access to the network, for this you need to close the menu. There should be an icon on the taskbar, it may look like an antenna and the symbols H, E, 3G next to it, the icon should glow.
6. If you experience connection problems, restart your Lenovo device.
Some users, even after performing all the above procedures, cannot connect to the Internet on Lenovo. Perhaps they made a number of mistakes when they tried to enter the settings for the Internet on Lenovo. A device malfunction can also be the cause.
There are situations when the Internet is urgently needed, and it is, for example, only on a friend’s smartphone, since any modern mobile device from Lenovo has a modem function. This is a rather useful feature that helps distribute the Internet to nearby devices, such as other smartphones or even a laptop. Moreover, you can connect even from a dozen devices at the same time, the main thing is that the Internet speed is enough for everyone. Using this feature is quite simple. You can learn more about how to distribute Wi-Fi on Lenovo in the instructions below.
In order to distribute Wi-Fi from a Lenovo smartphone or tablet, you need to perform a series of simple steps. The first thing you need is to connect to the mobile Internet, it is from it that the network that we are going to distribute comes from. It is recommended to connect to 3G or 4G for stable speed as simple mobile internet is quite slow.
This is done differently in different firmware and smartphone models, but in each case, you first need to go to " Settings", then click on the menu item" Yet". Further, depending on the firmware version, there may be different items: in one of the OS versions, the item is called " Modem Mode', in others it is ' WLAN hotspot" or " personal hotspot". One way or another, the same function is hidden under this item, it is it that allows you to make the distribution of the Internet work.

How to set up an access point, more will be said later.
Using settings
The modem function works on almost any smartphone, this applies even to fairly old models. So, even on the Lenovo A1000, Wi-Fi distribution is carried out without the slightest problem or interruption.
To safely enable access points on Lenovo, you must first set a password and change other settings. If this is not done, then anyone can connect, which means that this user will be able to waste your precious traffic or, even worse, try to enter the device and steal any data.

Setting a password and other options
You can set a password on any of the company's smartphones, but let's look at how this is done on the Lenovo S860 and its younger model S850.
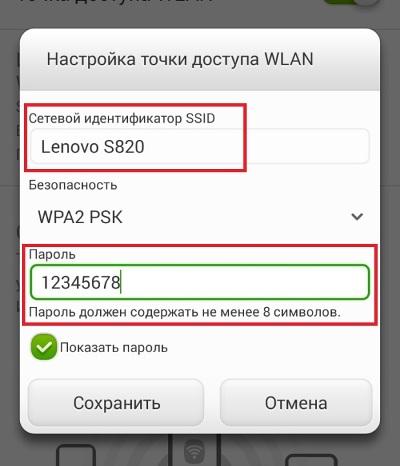
After setting up the access point, the choice of distribution method pops up, we need " Use WLAN connection". The following menu will open, there you need to click on " Set up the main point of the wireless network". Next, a window will appear in which you need to enter the desired name of the access point, its password and security method, including WPA2 PSK and WPA PSK. When all the data is entered, you need to click on the button " Save».
After these simple manipulations, the Wi-Fi access point is ready and, importantly, protected from third-party interference. Now you can freely distribute the Internet to everyone to whom you tell your password.
However, this is not the only way to distribute the Internet. You can do this with the help of third-party programs.
Using third party software
We looked at the basic way to share Wi-Fi on your phone, but with the help of third-party applications, everything can turn out faster. Some programs even increase the reliability of the connection. This will be useful for the distributor from the Lenovo phone, since no one will be able to hack it, even if they try.

Osmino
Osmino is one of the most popular applications that allows you to create a hotspot. This application allows you to create a secure point from which you can distribute Wi-Fi in just a couple of clicks.
You no longer need to think about how to distribute the Internet with Lenovo. All that is required is to download a small application, install it and run it. Immediately after that, the access point settings will open. There you can enter your nickname and the desired password, after that you need to click the " distribute". These actions will start the distribution of the Internet from your smartphone.
The application is quite lightweight and will run on any company device, including Lenovo A5000.
One of the most common problems faced by a person who bought a smartphone on the system android, this is the internet setting. Statistics even flashed on the Internet, which indicated that approximately 80% of phone users Android, do not use most of the pre-installed apps and features. I will try to tell you more about all the possibilities of connecting to the Internet on our communicators.
Setting up Internet access through a telecom operator on Android (GPRS / EDGE / WCDMA)
After you have inserted the SIM card into the phone, the operator basically sends and sets the necessary settings for the service on its own. SMS, mms and mobile internet. But even after that android the phone will not connect because additional options need to be enabled.

We go to the phone settings, there are two ways to do this, go to the application menu and find the gear with the inscription "Settings", or press the options button in the main menu if you have additional touch buttons.

Choose an item "Net", it happens to be the very first in the list. We get into the settings of everything related to network communications. Go to "Mobile networks", we need to set up an access point, go and select the one in which the word appears Internet.


If there is no access point, you can create it manually.

Click on the button options -> new hotspot, you need to specify a name, any one that comes to mind, the second parameter "access point" must be found out exactly from the book that comes with the SIM card or on the operator's website. If there is neither one nor the other, you can try to enter the word in this paragraph Internet, or the address of the operator's website, for example: www.mts.ru.

Back in "Mobile network settings" put a tick opposite "Batch Data", with the right settings, you can launch a browser and start surfing the net. Keep in mind in the usual tariff plan, the cost of a megabyte of received or sent information costs about $ 1, which is very expensive. Therefore, it would be reasonable to buy a tariff package with cheap Internet, for example, I have a tariff plan in Ukraine ENERGY, when replenishing an account, they take 1 dollar and for a month 20 megabytes of free Internet are allocated daily. This is enough to sit on Vkontakte, ICQ and surf the Internet through a browser with good traffic compression almost all day mini opera, Dolphin, UCbrowser. The native browser built into the smartphone consumes exactly the same as a regular one on a computer, so to save money, you can turn off the display of pictures in it.
Setting up Internet via WiFi on Android
Everything is as simple as possible here, in most cases it is not even necessary to go to the menu, just open the information curtain at the top and turn on the item WiFi. The phone will display a list of available networks and automatically connect to the free hotspot. But these days you rarely see such a freebie, and therefore, most likely, access points will be closed with a password. If you are the owner of the code, click on the desired network (name of a cafe, restaurant, hotel) and enter a password, it will now be permanently stored in your phone. Now launch your browser and enjoy the Internet at high speed.


It also happens that the Wifi network parameters must be entered manually, so we go to Settings->Networks->Wi-Fi Settings. Here you can add an Access Point manually knowing it SSID(exact name), security mode and password.
To access the World Wide Web from a mobile device, you need to know how to set up the Internet on phone for specific mobile operators. The setup process may vary depending on the features of the services provided. Generally, there are two types of tuning: automatic and manual. Let us consider in more detail the instructions for connecting the Internet for most popular mobile operators.
Automatic settings
The easiest way to access the internet on Android through a mobile operator - order the automatic configuration service. It is free and does not depend on the operator and on the connected tariff. All the user needs to do is send a request and receive the settings in response. Automatic ordering of special settings will determine the model of the device used and send all the settings as an SMS message.
How to connect your phone to Wi-Fi?
If, after receiving automatic configuration, the smartphone cannot access the Internet, make sure that:
- You have connected the required tariff;
- There is money on the mobile account;
- The sent settings have been set;
- The phone has been rebooted.
Some Android device models may not support the auto-configuration feature for operators MTS, Life, Beeline and others, so you need to create and connect an access point yourself.
Notice! Most users get automatic settings after the first connection of the SIM card. Check your incoming SMS messages to make sure that the parameters ready for installation have arrived.
To order add-ons from the operator, you need to go to the official website of the company and fill in the required fields, then send a message to smartphone or you can use short numbers:
- MTS - http://www.mts.ua/ru/online-services/settings#settings-auto . To order MTS 3g, also use this site, but remember that you first need to connect a suitable tariff plan so that in the future all money for using high-speed Internet will not be debited from your mobile account;

- Life - dial and execute the command *123*6# or send a standard message with the text INTERNET to number 123;
- Beeline dial the command *110*181# and wait for the settings;
- Megafon - send an SMS with a unit to the short number 5049;
How to send free SMS over the Internet
Manual connection setup of the MTS operator
MTS is a major mobile operator that provides its services in Russia, Belarus and Ukraine. If your Android device for some reason cannot load the automatic settings of the operator, you need to configure the network settings manually.
To do this, follow the instructions below:
- Go to the main menu on android;
- Open the settings window and select the "Wireless Network" tab in it;

- Connect the mobile internet function. To do this, check the selected area (Figure 2). Please note that if you do not activate this option, further settings will not allow you to connect to the network;

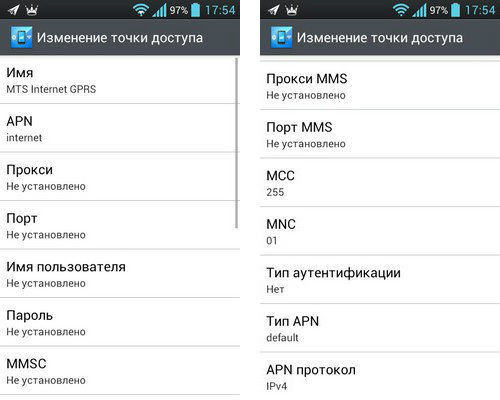
- Now select the mobile networks window. In the proposed list, find the profile "MTS Internet". If there is no such list item, you must create it yourself. To do this, click on the item "create an APN access point";
- To create an access point manually, you need to enter the following parameters. Name (Name) - MTS, Login and password - mts, access point address APN - internet.mts.ru. The remaining parameters must be left as standard, as shown in the figure below;
Some smartphone models in the authentication type area may contain the value "not specified" by default. In order for the connection to the network to be stable, you must set the value to "No".
To manually configure the Internet for Beeline and Megafon, you need to create a similar access point, you can find out its address by contacting the operator.
Manual setup of the Life operator connection
Life is one of the largest mobile operators in Ukraine.
To set up and connect your Android smartphone to the Internet manually, follow the instructions:
- Go to the main menu of your smartphone;

- Then turn on the settings window and select Connections. Depending on the version of the operating system, this menu item may be called "Mobile communications", "Mobile network" or "Connections". Go to this window and select the "Other networks" option, as shown in the figure below;

- Next, click on Mobile networks;

- Check the checkbox to enable mobile data and then open the hotspot window;

- Press the key to create a new hotspot;
- Then scroll down the window and find two items: to configure the type of access point and the type of verification of its authentication;

- In the authentication window, set the value to PAP;

- In the window for changing the type of access point, write the default value in the text and click on the confirmation button;
- Now the newly created one will be displayed in the access point menu. Select her;
- Reboot your phone. After turning it back on, check if the data transfer mode is enabled in the network settings. Now you can start using the Internet.
Connecting 3G connection
If you want to use 3G Internet connection, you need to configure it on your smartphone. However, first you need to choose the MTS 3g tariff or from other companies, which is focused on high traffic consumption. Otherwise, the charge for using the Internet may be several times higher than the cost of regular 2G.
Look detailed description tariffs of Ukrainian telecom operators
The first thing to do to connect 3g MTS or Life 3g is to get automatic settings or create an access point yourself.
- Click on the network mode selection panel;
- Check box GSM/WCDMA$
- Close settings and restart your phone. Now a high-speed connection will appear on your smartphone that is connected to 3g MTS or 3g Life.

Some versions of Android have a different menu, in order to connect 3g MTS, you need to disable the “use only 2G” networks item in the settings, as shown in the figure below:

Internet access
To access the Internet you need a browser. Before turning it on, make sure that the data transfer mode from the SIM card you need is enabled in the settings. Go to the menu of your device and find the standard browser there. You can also download a third-party browser from the official app store.
After installing the desired browser, turn it on and go to any of the sites. If there is no connection to the Internet, you need to create an access point again or call the operator back. Perhaps your smartphone or tablet model has a special mobile Internet settings system.
Thematic video:
The easiest way to set up mobile Internet on your smartphone is to order automatic settings from your mobile operator. In principle, automatic settings should come to you automatically (sorry for the tautology) after you insert your SIM card into your smartphone for the first time. If for some reason this did not happen and you cannot order automatic settings, then you just have to configure the connection to the mobile Internet manually. How to do this, we will look at the example of a smartphone LG Optimus Black based on Android 4.0.4 operating system and mobile operator MTS Ukraine.
Press the "Menu" button and select "Settings" from the menu that appears. In the menu that appears, select "More"

In the "Wireless" menu, we are interested in the "Mobile networks" item. In "Cellular Network Settings" select "Access Points (APN)".

If you do not have a single access point in this menu, then you need to press the "Menu" key and select the "Create APN" item.

If the access point already exists, then you need to go into it and check the correctness of the entered settings.
Subscribers of other mobile operators can set up mobile Internet on their smartphone in the same way, only the access point name and APN will be different. You can find them on the websites of the operators.
Internet settings for major mobile operators in Ukraine and Russia:
MTS Ukraine APN: internet (for old contractors www.umc.ua) Login: (empty) Password: (empty)
Kyivstar APN: For prepaid subscribers - www.ab.kyivstar.net. For contract subscribers - www.kyivstar.net Login: (empty) Password: (empty)
DJuice APN: www.djuice.com.ua Login: (blank) Password: (blank)
Beeline Ukraine APN: internet.beeline.ua Login: (blank) Password: (blank)
life:)
Trimob(Utel, OGO mobile) APN: 3g.utel.ua Login: (blank) Password: (blank)
MTS Russia APN - internet.mts.ru Login: mts Password: mts
Megafon Russia APN: internet Login: (blank) Password: (blank)
Beeline Russia APN: internet.beeline.ru Login: (blank) Password: (blank)