Do-it-yourself dog house. Drawings and dimensions
The main stages of building a booth for your pet are choosing the optimal size, selecting materials and assembling. All work can be completed in one day, which will help our detailed instructions indicating all important points. It can be difficult to measure a dog, especially if it is overly active.
Design choice
The design of the booth can be one-volume or with a vestibule. The second option is preferable - the vestibule prevents the cold wind and draft from blowing into the sleeping area. The zones are separated by a partition with a passage or a curtain.

The ceiling needs to be removable. This will allow, if necessary, to open the kennel for cleaning or to provide the animal with veterinary care. The roof can be single-pitched or double-pitched. From a practical point of view, there is no difference. A shed roof is easier to make, and the advantage of a gable roof is the extra storage space for dog toys.

Determining the size of the booth
The dimensions of the booth must correspond to the size of the dog and climatic conditions. The dog should easily turn inside, lie freely and roll from side to side. But at the same time, the booth should not be very spacious if it is used in winter. In severe frosts, a large space is more difficult to warm up, the animal will freeze.
The calculation of the dimensions of the kennel is carried out according to the following measurements:
- Width (bed) - the length of the dog from nose to tail. If the kennel is divided into a vestibule and a sleeping place, then the size increases in accordance with the animal's complexion by 400-600 mm.
- The height of the booth is the height of the dog in a sitting position plus the thickness of the litter plus a margin of about 10 cm. The dog should sit without touching the ceiling, but walk inside with its head bowed.
- The depth of the booth is the length of the dog lying on its side with legs stretched forward from the tips of the paws to the withers plus a margin of 10 cm.
- The height of the manhole is the height at the withers minus 5-8 cm.
- The width of the manhole is the width of the chest plus 5-8 cm.

If you still have a puppy, then in building a booth you should be guided by the breed. According to the size of the dogs, they are divided into three groups, respectively, and the recommendations for the dimensions of the booth for them differ:
- Small breeds (poodle, dachshund, pug, cocker spaniel, etc.). The height of the booth is taken 600 mm, width and length - 700 and 550 mm.
- Medium breeds (Doberman, Bobtail, Bull Terrier, etc.). Their height at the withers reaches 40-57 cm, so the height of the kennel is up to 800 mm. Dimensions - 1200x750 mm.
- Large breeds (shepherd dogs, mastiff, dalmatian, etc.). Their height at the withers is more than 75 cm, so the booth should be spacious enough. Height 950 mm, width and length - 1400 and 1000 mm.
Selection and preparation of materials
The ideal solution for construction is softwood.
- The frame will require pine bars 100x50 and 50x40 mm.
- The inner lining is made of wooden lining or moisture resistant plywood.
- The junction of the wall and floor sheathing is closed with a board or plinth along the perimeter.
- The outer skin must withstand precipitation and prevent blowing. Suitable lining, block house, plastic eurolining, fiberboard, covered with waterproof paint.
- The floor is solid, without holes and slots. A grooved floorboard will do.
- For the ceiling, you will need 40x40 mm bars and a sheet of plywood. If the ceiling is insulated, then two sheets of plywood are taken, between which mineral wool or polystyrene and glassine are laid.
- The roof frame is made of bars 40x40 mm. It is sheathed with glassine, and a lining is attached on top. To protect against bad weather, the roof is covered with roofing felt, shingles or other waterproof material.
- Insulation: mineral wool, polystyrene foam or sawdust mixed with clay.

The work will require:
- antiseptic impregnation;
- galvanized nails;
- saw;
- hammer;
- screwdriver;
- self-tapping screws;
- stapler and staples;
- pencil and tape measure;
- level and building corner.
Base and frame
Cut two beams 100x50 along the length of the booth, between them along the edges two more beams are laid in the depth of the booth. A dovetail connection would be ideal, but a half-tree joint is enough when a cut is made on top of the side bars and a lower groove on the longitudinal ones. Fix the connection with galvanized nails or hardened self-tapping screws.

In the place where the partition will be installed, a 50x40 timber is attached, which is inserted into the grooves on the base. Additionally, a jumper should be installed in the middle of the sleeping chamber.
From below, the frame is hemmed with roofing material and glassine. You need to fix the filing with two longitudinal bars in the overlay to the transverse bars of the base. They will provide ventilation of the bottom of the booth and a gap between the booth and the ground.

Lay the insulation tightly and cover with another layer of glassine on top. Next, lay the floorboard with the lock, fixing it to the base with self-tapping screws.

In the corners and on both sides of the manhole, vertical racks of 50 mm timber are installed along the height of the booth minus 50 mm. Under the partition, it is better to install a beam 100x50 with the wide side along the jumper so that it goes inside the booth. Fasten the bar to upper bound hole between the posts.
Prepare a 50x40 timber frame for the upper part of the walls, along with a lintel for the partition. Connection in half a tree. Install and fix it on vertical racks.

Fasten the vertical post in the partition, stepping back from the edge to the width of the main hole, forming a passage.
Walls
The frame is sheathed with sheets of plywood or dense moisture-resistant OSB, forming the inner surface of the booth from the inside. Cut a hole for the manhole. Sheathe the partition, leaving a passage from the side of the main chamber of the booth.

Lay glassine on the outside in the resulting niches and secure it with a stapler. Place the insulation tightly and cover it with another layer of glassine. From the outside, close the booth with clapboard, moisture-resistant plywood or OSB.

Roof
For the roof, a frame of 40x40 mm timber and gables are prepared separately. For a shed roof, the gables are a right triangle. Racks on one side to the height of the roof from timber and logs across the entire width of the frame.

For two slopes, a central rack is installed along the long side of the frame and logs on the sides.

Close the resulting planes with sheets of plywood, and preferably with lamellas, with a gap of 3-4 cm. Lay roofing material on top of it with at least 5 cm at the edges and any available roofing material.
Hem the roof from below with glassine and insulate. The insulation layer is closed with glassine and hemmed with plywood or clapboard. In plywood, pre-drill ventilation holes in a checkerboard pattern or in rows with a distance of about 10-15 cm.

The roof is attached to the canopies to the main frame of the booth.
Booth installation
For the booth, look for a flat place on the rise so that the view from it falls on most of the yard or farm. If there is no natural rise, then form an embankment of crushed stone of a large, and after a small, fraction. Smooth pebbles would be preferable. Most of the time, the booth should be in the shade, but you should not additionally shade the space around it.
We will send the material to you by e-mail
When a family living in a private or country house gets a four-legged guard, you should immediately worry about the pet's place of residence - not everyone likes living together with a dog. The editorial staff of the online magazine site offers to solve the issue of pet housing and offers recommendations on how to make a do-it-yourself booth for a dog.
This is protection from all weather conditions and a comfortable existence of the dog on the site.
When people build a house for themselves, they do not think about making it ugly and uncomfortable, so it is with a dog: a living being needs good conditions for life.

The slope at such a roof is directed away from the entrance so that water does not drip onto the nose of the animal sticking out of the passage, creating a puddle under the booth.


A feature of gable booths in harsh places of residence is the addition of an attic floor - this will minimize heat loss.
Advice! Under the roof, it is easy to equip a place to store dog supplies.
How to determine the size of the doghouse
When you need a booth for big dog breeds such as Alabai, Tibetan Mastiff, St. Bernard, it is important not to make a mistake with the size: a maturing dog should not feel like a salty mushroom in a jar in the house. Yes, and it’s not comme il faut for a small dog to sit in a huge building in winter - you can’t warm it with your breath for anything.

We measure the pet - the length of the kennel should be +5 cm from the length of the animal from nose to tail. The width is indicated based on the height of the dog plus 5 cm. Now you need to measure the girth chest: the manhole should be wider by the same 5 cm and 5 cm longer than the height of the animal at the withers.
Advice! If the dog has not yet grown up, then you can focus on the indicators from the reference books.
The height of the kennel should exceed the height at the withers by 15 cm: the dog should not touch the ceiling with his head if he wants to sit inside. The depth is designed so that the pet will comfortably lie down on its side and be able to freely stretch its paws. The height of the beast at the withers is increased by 15 cm and the depth is obtained.
When designing a kennel from vestibules, the dimensions of the animal are calculated: it will be convenient for small breeds in a room 75 cm long, 65 cm wide, 65 cm high, but a shepherd dog will appreciate 120-125 cm in length. Very large animals will need a room length of 145 cm, a width of 105 cm and a height of 100 cm.
How to choose a place for a dog house
The choice of place is due to the desire of the owners to create good living conditions for the animal:
- do not put the kennel in an open sunny area;
- the place should not be at the crossroads of all conceivable and inconceivable winds;
- put the booth close to the fence with gaps - get a twitchy nervous animal. The beast can be teased by children and simply annoyed by people walking by;
- the same applies if the street behind the fence is extremely noisy, it is better to install the building not near the fence, behind which there is such a loud life;
- when setting up a booth in a lowland, you should be prepared for the fact that the dog will move to live in the house in the very first spring, since its dwelling will simply float in the water.

How to insulate a doghouse
Do you need a warm dog house? If the animal was lucky enough to live "in the south", then you can congratulate the owners on the fact that they do not need to bother with warming the dog's home. The northern regions will again have to invest here.
As a heater, sawdust, polystyrene and mineral wool are good. The floor, walls and roof are also subject to insulation. Mineral wool, polystyrene foam or ordinary sawdust are used as a heater. Insulation is laid on the walls and roof from the inside. Then the insulating material is covered with a vapor barrier. The floor is insulated from below with ordinary sawdust.
How to build a wooden dog house with your own hands
Having admired the photo of the doghouse for the dog on the Internet, it's time to start creating a do-it-yourself dog house made of wood.

Wood is an excellent material that has been tested for centuries. Yes, such a kennel will last less than a brick one, but next time it will turn out to be a palace. If desired, you can build a dog house from pallets and pallets, which are easy to sheathe with plywood sheets. But if you approach the matter thoroughly, they prepare both good material and a set of tools. A blockhouse or slab is also recommended as a building material: the products are massive, durable and chic.
Video about the construction of a wooden booth
How to prepare a drawing for making a do-it-yourself doghouse
First of all, if necessary, to assemble a house with their own hands, they prepare a sketch and drawings of a dog kennel.


First, we draw a sketch of the future structure, then we measure the dimensions of the animal. According to the sketch, we create a drawing in two projections and indicate all dimensions on it. If there is absolutely no experience in construction, then it is better, in addition to the general prefabricated drawing, to draw individual elements, so it will be easier to navigate in detail.
floor and frame
For stationary products, it is better to make a columnar foundation; for a portable one, hemmed thick boards in a couple of rows will fit.

A sheet of plywood is laid on the frame. When the bottom is ready, it is turned over so that, on the other hand, foam plastic is placed in the space of the bottom for insulation. It is closed with plywood.
Now they begin to install vertical racks of square bars at the corners of the bottom. They are fixed with steel corners. It is worth making sure that the vertical level does not go astray. The upper harness is screwed onto the columns and intermediate racks are installed if the booth is supposed to be two-room.
Rear wall and front
The back wall and facade can be cut from plywood directly. This will require compliance with all the dimensions indicated in the drawing and an electric jigsaw. If the assembly is carried out from a cut board, then, again, to facilitate the work of a beginner, you can draw a template of the finished size directly on the ground and refer to it. Having sawed off unnecessary parts of the boards, you can nail the elements onto the frame.
Roof and side walls
It does not matter whether it is decided to install a shed or gable roof - any option must be removable. This will help for free access to the inside of the building to change bedding and disinfect.

On a pitched roof, take a bar 40 × 40 cm and a sheet of OSB. The bars are knocked down into a frame corresponding to the internal dimensions of the building. A sheet of OSB is laid on top. The roof is insulated with foam, which is covered with a moisture-proof film. Plywood is laid on the insulation. It should be taken into account that it should be 8-10 cm larger than the frame on the side and rear, and 18-20 cm on the front.

How to make a do-it-yourself brick dog house
A small bean is unlikely to need a serious brick building, but such a house will come in handy for huge watchdogs.

To build a strong, solid brick kennel, they mark up the future building on the ground and begin to dig a trench along its perimeter. A size of 25 × 25 cm is enough - concrete is poured into the trench and further work is started only after a few days. First lay out the walls, regularly checking the compliance of all verticals and angles, which should be perfectly straight. Where the hole is located, a pass of several bricks is left. Upon reaching the desired masonry height, a wooden board is laid above it. Further masonry will already be solid. From the inside, the house must be completely insulated with clapboard or sheathed with wooden boards. The roof is made separately and installed on the attic wooden floor.


Again about the drawings and other nuances of making a do-it-yourself booth for a dog
Not everyone understands the value of a good drawing: the more carefully the details are worked out at this stage, the less chance of error remains during construction. Do not rely on the fact that the hands themselves will feel the material - if you want high-quality durable work, then do not neglect the drawings and step-by-step instructions.
Recommendation! To build a drawing, you can use the services of architectural programs.
Site layout
It has already been said above where the kennel should not stand. Let us clarify that not every site has a free suitable place, but human hands are created to correct the shortcomings. Any place can be brought to mind: to combat dampness, drainage and raising the soil level are used. A drainage trench will also help here. Ideally, a house with a platform can be placed on stilts.
If the dog will sit on a chain, there is an option to install a long steel wire for more freedom for the pet. The chain will slide along the wire, the dog will be able to run at a distance of the extended chain and return to the booth. You can concrete the site - but keep in mind that dogs love to dig holes and hide bones there. Therefore, if you want to leave such an opportunity for your pet, then you should concrete the space around the booth, otherwise the dog can dig the foundation, and in the spring it will be washed away with streams of water.
Preparatory work and pouring of the concrete layer
The roots of stumps and trees are removed from the territory, the place is leveled, a trench is dug (for a strip foundation) or holes (for a pile foundation). No difficulties are foreseen at this stage.
The nuances of making do-it-yourself houses for a dog in an apartment
The apartment does not require insulating a dog house, which saves building materials, finances and own strength.

You can build such a house from scratch, using the recommendations for building a coffee table, but instead of drawers, leave free space inside.

The structure is built in the same way as a wooden building for the street.

For large breeds, it is easier to take any old chest of drawers and restore it to fit the interior of the room by laying a bedding inside the makeshift dwelling.

For a dog that lives on the street, her booth is an essential building for a comfortable stay, this is her home, where she rests, hides from frost, rain, snow in winter and hides from heat in summer.
If you want to give a home for your beloved animal, it is not necessary to go to the store and try to choose the most suitable home for it. Anyone who has minimal building skills can build a doghouse for a dog. However, the construction of a doghouse is not entirely simple, there are certain nuances and secrets here, which we will discuss in this article.
Choosing the location of the dog house
Before starting the construction of a dog kennel, you need to choose the most suitable location for its location.
For this you need to be guided by the following:
- the location of the kennel should be dry and moderately sunny;
- there should not be other pets near the booth, as their waste products negatively affect the health of the pet;
- the place should be spacious and free for movement;
- remember, any objects located nearby can become a favorite pastime for your four-legged friend;
- the dog from the booth must see everything that happens around, all family members and guests, otherwise he will be excited about something all the time.
Choose booth design and material
Dog kennels can be very diverse, both inside and out.
The simplest version of the kennel is a square, often rectangular room with a hole covered with some kind of cloth.


More thoughtful and comfortable for the dog is a booth with a vestibule. It protects the pet much better from cold, rain, snow and wind. Basically, the vestibule is not insulated, however, if you want to further reduce the heat loss of your home, then it is better, of course, to fix a layer of foam or mineral wool, and hang a curtain at the entrance, for example, from an old overcoat.

Pine and spruce boards are the best material for building a doghouse, they are not only durable and practical, but also able to scare away various annoying insects with their smell.
Brick, plywood, foam blocks, etc. are not the best option for a kennel, as over time these materials will begin to delaminate.
For the frame, bars of 40x40 (50x50) or 40x25 (50x25) millimeters are suitable. For external cladding - wooden lining, plastic eurolining, etc. For internal cladding - lining or waterproof plywood with a thickness of at least 5 millimeters. As a floor covering for a kennel, a tongue-and-groove floorboard is ideal. Mineral wool, polystyrene foam is an excellent option that serves as a heater.
Booth size selection
The dimensions of the booth are selected based on the size of its owner and the climate of the environment. Conventionally, dogs are divided into small, medium and large. Booths are divided according to the same principle. For the smallest, for example, Shih Tzu, Dachshunds, a kennel 600 mm high, 700 mm long and 550 mm wide will be comfortable. For medium, Rottweiler, German Shepherd, a booth with dimensions of 750x1200x800 mm is suitable. For medium-sized ones, for example, a Caucasian Shepherd Dog, a dwelling with dimensions of 1100x1400x1000 mm would be ideal.
However, amendments are possible based on the individual characteristics of your four-legged pet. The dog should enter without problems, and turn around in the booth. The width of the manhole is made according to the width of the chest, adding 50-100 mm. The height of the manhole is determined by the height of the animal minus 50 mm.
It is worth remembering that too spacious a kennel will not warm up well in winter, so it is important to make it the most optimal size for a dog.

How to make a dog house - instructions
From the very beginning, you should decide on the dimensions of the dog's home and cut out all the details of the intended size. After that, you can proceed to the assembly of the kennel for your favorite animal.

Bottom
It is always necessary to start building a dog house from the bottom. In order for the booth to be as warm and comfortable as possible, the floor needs to be slightly raised above the ground or made double. To do this, use two beams 40x40, on top of which you fix the floorboard. To prevent your beloved pet's claws from getting stuck in the cracks, lay a sheet of plywood on the floor.

Walls
The next stage is the construction of the frame of the future booth. The best option to ensure maximum warmth of the dog's home would be a structure consisting of double dense walls, between which there is a heater, for example, mineral wool.
At the corners of the finished base, four support posts 100x100 are mounted with a length equal to the height of the booth plus 4-5 cm, install a strapping of bars along their upper part. After that, you should organize the entrance area.
Nails need to be hammered from the inside of the frame; use screws to further strengthen the wooden frame.
Dog kennel drawing:

Roof
The roof should fit snugly against the walls of the kennel, but it is not desirable that it be tightly nailed, as this will complicate the process of cleaning the dog's home later.
As a roofing material, corrugated board, tile or slate is well suited.
For the manufacture of the roof structure, wooden blocks 40x40 are used, of which the perimeter is knocked down, on which plywood sheets are attached.
If the doghouse is large, then in order for the plywood not to sag in the middle, it is necessary to install intermediate blocks.

The length of the roof ridge beam should be slightly longer than the length of the doghouse itself in order to provide a canopy behind and in front. Fasten it over the roof racks. Three rafters are needed on each side of the roof, the upper ends of which must be cut at the angle of the roof. Initially, having attached the rafters to the ridge, mark the points of contact with the frame of the kennel, then use a hacksaw to prepare triangular grooves. Next, carefully fix the ends of the rafters to the booth. Connect the horizontal bars to the racks of the frame. To the lower end of the rafters, nail a plank that protrudes slightly on both sides of the roof.
Cut four more rafters (2 pairs each), nail their upper ends to the ridge with nails, and attach the lower ends to the planks previously stuffed into the frame rafters. The result should be a roof frame in the form of a triangle.

Then cover the resulting frame with plywood.
In order to be able to lift the roof for cleaning in the future into the ends of the corner bars, half-hammer nails with a diameter of about 10 mm, and cut off the caps. Gables will be put on these pins, in which holes should also be made.
For convenience, handles can be equipped on the roof.
If your pet is on a leash, then you should definitely take care of some kind of canopy in front of the booth so that he can hide in a cool shade.
Dog kennel insulation
Wooden boards must be treated with a special solution from the appearance of mold and, accordingly, an increase in the service life. It is necessary to soak the entire kennel with this liquid, starting from the bottom and ending with the roof.
Initially, parchment is laid on the bottom of the booth, which acts as a vapor barrier, and fixed with a stapler. Then a heater is fixed, for example, mineral wool or polystyrene, after which the parchment is once again covered. This is necessary in order to prevent the penetration of micro-particles of insulation, which can adversely affect the health of the animal. Then a sheet of plywood is attached.
By the same principle, they insulate the walls of a dog's dwelling: they attach a vapor barrier, then a heater, after which they lay a waterproofing and sheathe it from the outside.

At the entrance to the booth, it is better to equip curtains made of felt or tarpaulin, which forms additional protection for the pet from cold and heat. To prevent the tarp from rising at the bottom of the curtain in strong winds, attach special plastic bags with sand.
Consider the option of additional insulation of the booth. The rule always works: the smaller the volume of the room where the dog is located, the easier it is to heat it up with the heat of your body.
Let's take as a basis an insulated booth with a vestibule. The walls of the vestibule, as well as the entire booth, are insulated, and the entrance is covered with a curtain.

Inside the booth there is another partition with a curtain. It can be made removable, for the summer it is removed - it turns out a spacious room where the dog can lie on its side to its full height, and for the winter it is mounted, while more than half of the room is allocated to the vestibule - a square space is obtained where the dog can sleep curled up.
The change is to increase the space of the vestibule and reduce the bed.
The dog will now have two sleeping places: the vestibule is a colder space, and the small bedroom-nest is warmer. In which of them is located, the four-legged pet will decide for itself.
sheathing
After the construction process is completed, the kennel should be sheathed with roofing material from the outside and from the inside using galvanized nails. For interior lining, lining, plywood or chipboard, soaked in advance with drying oil or varnish, is suitable.
The outer skin is more demanding on materials, since the booth must combine not only efficiency, but also attractiveness. For these purposes, such lumber as lining, block house, wooden panels, etc. are ideal. To prevent water from entering the slots, the lining must be fastened with self-tapping screws with the spike up. The tree outside is impregnated with a protective compound, if desired, painted. A dog house covered with the same material as your house, for example, stone, siding, etc., will look very harmonious and attractive.
The final stage of arranging a home for your beloved pet
For your pet, be sure to make a soft bedding of hay, straw or sawdust.
The most optimal warrant will be the use of pine and cedar sawdust for these purposes. They are very soft, perfectly absorb excess moisture and bad odors, in addition, they repel various insects well. They are environmentally friendly and have a pleasant pine or cedar scent.
Always remember that dogs require special care and home warmth, so the construction of a warm and cozy dog home should be taken responsibly.
When a dog appears in the house, the question of housing immediately arises: somewhere she must sleep and hide from the rain. Not everyone wants and can keep them in the house, because the kennel is required. A do-it-yourself dog house is built, even without skills, in one day. There is nothing complicated, but there are features.
Decide on size and design
The right booth for a dog is built for a reason: you need to know what size it is required, where and what size to make a hole, what is better to make and how to insulate.
First to first, they are determined with the size of the dog kennel. The easiest way is to focus on the dimensions of your dog. In height, the dog house should be 5-6 cm higher than the pet, in width / depth approximately equal to the length of the body, plus 10-20 cm in length to be able to extend the paws. In general, cynologists have recommendations for the size of dog kennels. They recommend making booths depending on the size of the breed. The data are presented in the table (width / length / height of the dog house are given in centimeters):
If your pet does not exceed the average size of its breed, you should not increase the booth: it will be difficult for him to warm it in winter. Please note that these are internal dimensions, if sheathing is planned, the dimensions are increased by the wall thickness.

What is the width of the hole
There are recommendations regarding the width of the hole. It is determined depending on the width of the dog's chest. Measure, add 5 cm, get the width of the hole. The height depends on the height of the withers: add 5 cm to the measured value. For a puppy, the hole is made small at first - a little more than required, as it grows up.
The hole in the doghouse is not located in the center, but closer to one of the walls. With such a structure, the dog will be able to hide from rain or wind behind a solid wall, curled up in a protected part. It is often proposed to divide the booth with a partition, making a kind of "tambour" and a sleeping area. But hiding in a fenced-off compartment, the dog cannot control what is happening in the entrusted territory. Many conscientious watchmen really do not like to go there. Some, even in the most severe frosts, lie opposite the entrance, not wanting to leave the post. So, the variant with a displaced manhole shown in the photo is optimal.
Another point: at the entrance to the doghouse there should be a threshold 10-15 cm high. It protects the dog lying in front of the entrance from wind and precipitation, prevents snow and rain from clogging inside.

roof type
The roof in the dog house can be single-pitched or double-pitched. Shed, preferably: not very large animals like to sit / lie on it. So they can control a large area.
Another point: since there is no heating in the booth, in winter the air in it is heated from the heat generated by the body. The larger the volume, the longer the kennel will warm up. The gable roof on the dog house just significantly increases this volume, without bringing any other benefit. If you want your dog to be happy, make a pitched roof.
If you don’t like it at all in terms of aesthetics, make a ceiling, and then the roof itself on top. Moreover, it is desirable to make it removable or folding - on hinges. So it will be more convenient to carry out periodic cleaning and disinfection: organic residues are clogged in the cracks, in which fleas breed. It is from them that you will have to process the kennel from time to time.
The dog house must have a floor raised above the ground. To do this, make the legs at least a few centimeters high or knock down the frame, on which the floor boards are laid directly.
In general, if possible, dogs prefer to spend time outside. Therefore, it would be nice to make a canopy in front of the doghouse or on the side of it. And in order to be able to sit / lie under it - make a flooring.

In this booth, not a folding roof, but a front wall, which is also convenient for processing.
What to build and how to insulate
Most often, a dog house is made of wood or wood-based materials. Wood is preferable - it keeps cool in summer and warm in winter. In it, the dog will quite comfortably endure the winter, if the boards are fitted tightly, there are no gaps, even with a single wall, the wooden booth is warm. So that, by the way, the booth for the dog turned out without cracks, they use an edged board, sometimes even tongue-and-groove.
Concrete and brick booths are not the best choice: they conduct heat well, they are too hot in summer and very cold in winter. That is why dogs often prefer to spend the night in the open air, and not in a brick kennel.
If wood is too expensive, use boards for the frame, and everything else can be made from OSB, fiberboard, plywood. If you use sheet wood material, you may need two layers of it: it is still much thinner than wood and, due to the presence of a binder, has better thermal conductivity (retains heat worse). Therefore, in this case, you can think about warming the booth for the winter.

You can insulate with any suitable material. You can use the remains of the construction of a house, cottage, bath. It can be mineral wool (as in the photo), polystyrene foam or other material. When insulating with foam plastic, do not overdo it: it does not allow air to pass through, and if you hang a curtain on the manhole, the dog will stop sitting in the booth: there will not be enough air for it. Therefore, either leave small gaps or provide some kind of air intake channel.
If we are to insulate, then the floor and roof too. They are also made double, laying the same insulation. Too much insulation layer should not be done: the dog itself can warm up well, besides, it has a decent fur coat. And it is worse for her - frequent sudden changes in temperature than constant cold. If you want the dog to be warm, fill the kennel with straw for the winter: they will trample it where necessary, and throw away the excess. You need to change such a litter twice during the winter.
For the winter, a dense fabric, cut into rather thick strips, is nailed over the manhole. Two panels cut with noodles are fixed with a shift of cuts. So it turns out that the wind does not blow into the dog house, and the entrance / exit is free. But some dogs do not immediately get used to such an innovation and sometimes refuse to go inside.
You can paint the outside of the booth, but not the inside. The canopy and the wall from the wind (preferably one deaf one) are treated with antiseptics. There is no point in painting them. The main thing is to make the roof without cracks, so that it does not flow inside and does not blow out.
A firewood shed or a firewood shed is easy to make with your own hands. How to read.
Do-it-yourself insulated dog house
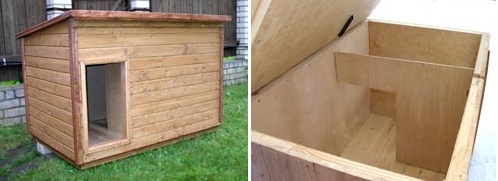
If we talk about the drawings, but the animal does not need any "bells and whistles" and too large sizes too. For them, this is a hole, and by definition, it cannot be large, and it is difficult to heat extra volumes in winter. The booth was made with two windproof walls and a small canopy.

First, two pallets were made in size with supports for four square beams, then they were connected to each other. It turned out a podium, on which the floor boards were fixed. The legs in the design are desirable - the floor will not get wet.

Bars were fixed in the corners. At the junction, six pieces were obtained: four for the kennel itself, two in front for windproof walls. First, they made the inner lining, to which they fixed 7 cm of foam, then sheathed the outside. To prevent water from flowing into the walls between the boards, the gap was closed from above with a plank of suitable width.

Walls in the booth with insulation
For the outer cladding of the wall, to which the windproof wall adjoins, the whole boards were used - so the structure is more rigid.

The longest fuss was with the roof. I didn’t want to make it completely flat, so we made an insulated shield strictly in size, which was attached to a slightly rounded roof from typesetting rails. At least it turned out without a slope, but due to the sloping shape, the water drains without problems. Since it still did not work out hermetically, a film was placed under the slats.
Booth from a bar for Alabai from a bar
Let's say right away that a doghouse was built from materials left after the construction of the bathhouse. It will also be placed next to it, because appearance it should resemble the bath itself.
This booth for a dog was based on a drawing with the dimensions of the booth for Alabai. But since the dog is not an Alabai, the sizes were made more modest. Adjustments were also made to the design: a window was made for viewing in the side wall, and a door for cleaning in the back.

First, they built and painted a platform - from the remains of logs, which were planed and knocked together. Then the actual assembly of the booth for the dog began. First, they planed and sawed in the workshop, and the finished structure was taken out and installed in place - near the bathhouse.
The first crown was laid whole. It forms the threshold and serves as a support for the entire structure. Then the beam was cut according to the scheme. Considering that the work experience was already there (the bath was built), the work went quickly.


Since it was supposed to make the roof a “house”, like in a bathhouse nearby, so that the dog would be warm, they made a ceiling. For it, a sheet of plywood was used. A dowel was made in the beam, on which a sheet of thick plywood cut to size was laid. Then the roof panels were assembled and installed.

They were not assembled according to the rules - they did not make a truss system. Since the roof is decorative, they assembled shields, upholstered them with the remnants of soft tiles (also left from the construction of the bath), then they were connected and sheathed with gables.

Then the pediments were sheathed with boards. The cracks were covered with boards. The dog house is ready. Made by hand in half a day.

Such a structure for a dog of this size will still be large. This booth is designed for more large dogs. The situation can only be saved by a partition installed inside, which reduces the width.
Another do-it-yourself dog house is made of OSB, covered with a professional sheet (insulation and inner lining are planned). The assembly process was filmed on video.