Do-it-yourself dog house drawings and dimensions. step by step photos
Dogs need shelter too, especially in the winter! You can build a good booth for a dog in one day. Materials for this structure can be found in any construction market.
By building a quality beautiful house for a four-legged pet, you can make your dog's stay outdoors comfortable in any weather.
In addition, the building will decorate the local area.
In this article, we will figure out how to make a booth, how to insulate a kennel for a large street dog for the winter, and how to decorate a dog house! So, we build ourselves, to our own conscience and to the envy of our enemies!
Size
Consider how to determine the size for the booth based on the fact that your pet has already grown:
- to determine the width of the structure, you need to measure the dog in height to the tips of the ears and add 5 cm;
- construction depth - the length of the dog from the tail to the tip of the nose with an addition of 5 cm;
- in order to properly equip the hole, we measure the dog at the withers and add 5 cm.
If you have brought a puppy that will live on the street from the first days, then you should refer to the table below, which shows the reference sizes of booths for dogs of different breeds:
Attention! The dog house should be of such a size that the pet can comfortably sleep and rest in it at any time of the year. Do not make too large a structure, the dog will freeze in it in winter.
It is better to make the entrance to the building closer to the corner, so the dog will have a small closed nook.  dog house for german shepherd

Drawing and diagram
Before you build a kennel, you need to submit its drawing! It is not necessary to draw up a special drawing for the booth, since the design is not complicated. You can simply draw a diagram on a simple sheet of paper and determine the dimensions of the structure on it.
If you want to build a booth with exact dimensions, then a drawing is needed. To complete the drawing correctly, you need to consider the following nuances:
- The interior space should be large enough for the dog to turn around freely. If the booth is made for a puppy, then you need to understand that he will grow up very soon, so it is better to build a large kennel right away;
- if it is planned to build a warm kennel, then it is better to use wood as a material - it is practical, environmentally friendly and is an excellent heat insulator;
- if there are frosty winters in the region of residence, then it is better to prefer a kennel built like sandwich panels, with insulation between the walls;
- if a booth is being built for big dog, then it is installed inside a special enclosure for a four-legged pet;
- it is also desirable to decide on the shape of the roof during the drawing up of the drawing. For a large dog, it is better to build a kennel with a pitched roof. Dogs love to lie on it in the summer. A gable roof is suitable for a small booth when you need to increase the usable area of \u200b\u200bthe interior space.
The development of the drawing will help to provide for all the nuances of the construction and the kennel for the four-legged friend will turn out to be of high quality and comfortable.


Instruments
Before starting the construction of the structure, it is worth preparing the necessary tool:
- screwdriver;
- hacksaw;
- hammer;
- marker;
- ruler or tape measure;
- planer - if unplaned material is purchased;
- metal scissors.
Also, before starting work, prepare the material:
- fasteners - self-tapping screws, nails;
- bars, boards, lining;
- roofing material;
- insulation;
- plywood or chipboard;
- impregnation to protect wood from external influences.
Important! Before building a booth, all boards and bars should be sanded so that the dog does not get hurt. Only the outer walls of the structure are treated with impregnation, otherwise there will be an unpleasant smell in the booth, which the dog may not like.
You also need to take care of the heat-insulating material even before the start of assembly, and choose the best option for environmental friendliness, practicality and affordability.
Material
The material deserves special attention, because its choice will depend on how comfortable the dog will be. We recommend building a kennel out of wood. For the construction of the structure, it is necessary to prefer larch or pine wood. Pine material, subject to proper processing, lasts up to 13 years. Larch lasts much longer, but also costs more. Which of these two breeds to prefer depends on the financial capabilities and preferences of the owner.

As for the roofing material, it is better to give preference to natural materials, such as tiles.
Floor
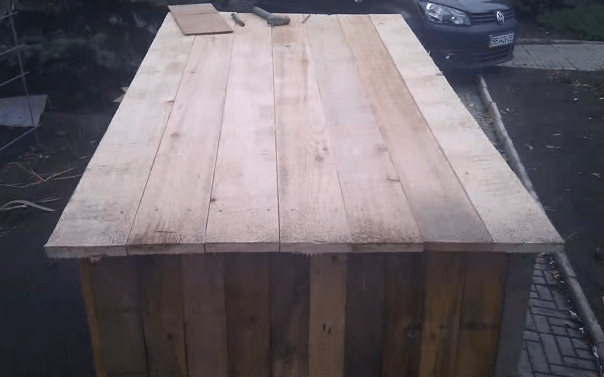
The floor in the kennel must be made of warm materials; it is unacceptable to construct concrete, stone or brick flooring, if it is not planned to install a system of underfloor heating to warm the booth. The best option would be dry, planed boards, fitted to each other. When laying the floor, it is desirable to make a technological slope to simplify cleaning in the kennel.
Walls


So that the pet kennel does not fail ahead of time - the wood rots in a humid environment, consider good system removal of moisture from the structure. do not treat wood with impregnations that repel moisture - this will have a detrimental effect on the health of the dog.
Roof
What kind of roof to install on the booth: single or gable, depends on the preferences of the owner. We will analyze the pros and cons of each option.

Simple lean-to
Dogs love to spend time in the kennel, especially during the warm season, so a kennel with a shed roof is most preferable. The roof should be made with a minimum slope. It is desirable that it be hinged - this will allow you to clean without much effort and disinfect the structure if necessary. Even at the construction stage, you need to insulate the booth to protect the dog from the winter cold.

Consider a step-by-step instruction with a photo on how to build such a kennel yourself:
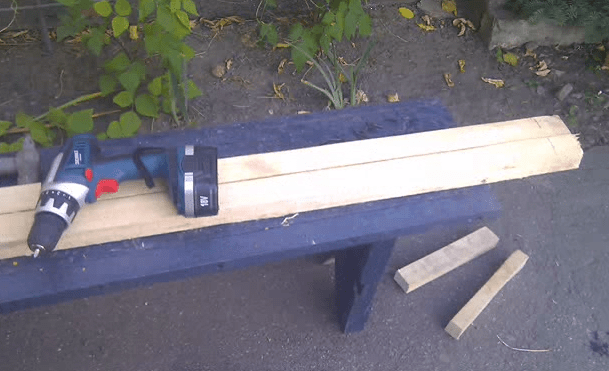
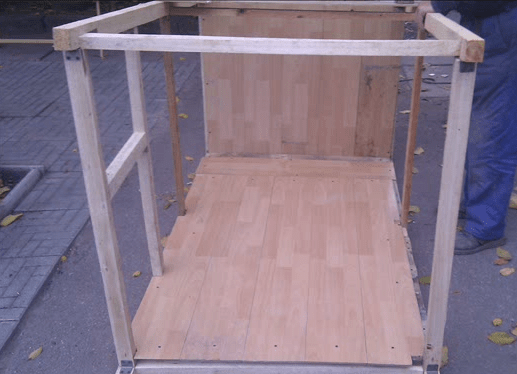
- deck construction
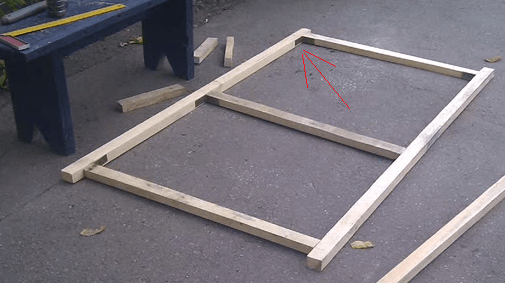
To create a flooring, you need to take a 4x4 cm bar, cut off two elements in length and 2 in width. Lay the bars on a flat surface and use self-tapping screws and corners to build a frame. For greater strength, install crossbars from a bar of the same size. Sew boards on the frame on one side. - Booth frame assembly
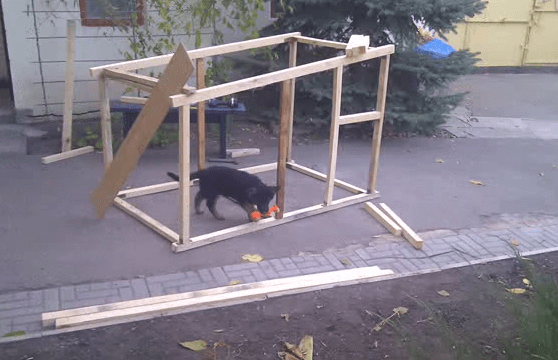
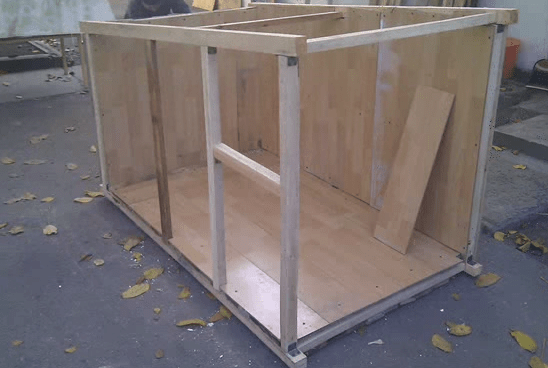
For the frame, you will need 4 bars 5x5 cm. Two bars should be equal to the height of the structure, and the second two should be 10 cm higher. Sections of the bars are installed at the corners of the bottom and fixed with self-tapping screws. There will be long posts in the front of the booth, and short ones in the back. Check all bars for level. To reinforce the structure, additional elements are installed in the center of each wall, and in the place where the manhole is arranged, two parallel bars are stuffed at the required distance from each other, equal to the width of the entrance. - wall cladding
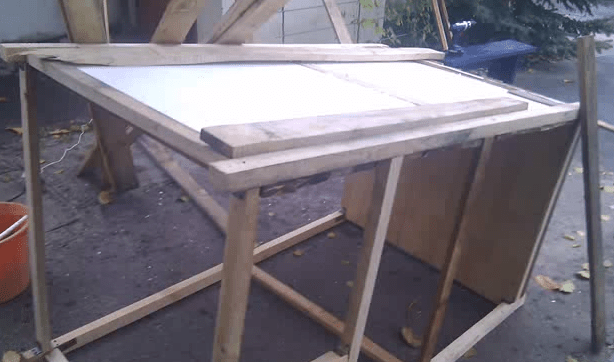
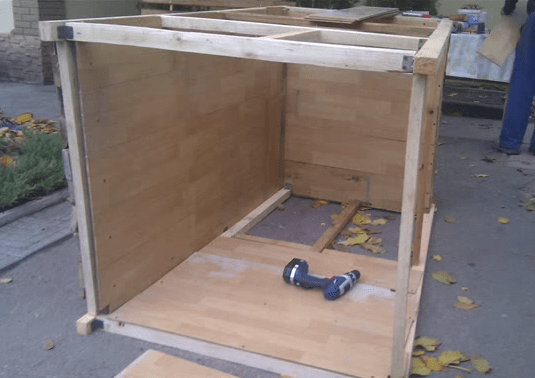
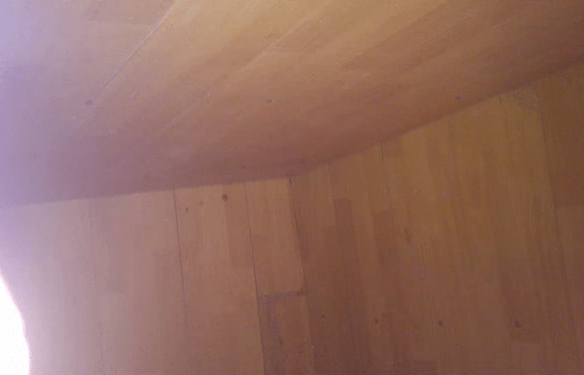
As soon as the frame is ready, it is sheathed on the front side with a wagon-rail. The inner part of the structure is sewn up with plywood or chipboard. The inner lining is attached to self-tapping screws, while the hats must be sunk into the plywood by 1-2 mm, otherwise the pet may get hurt. - Roofing
For the roof, 4x4 cm bars and OSB are used. A frame is assembled from the components, which is equal in size to the inner perimeter of the kennel. OSB is cut out and sewn onto the inside of the flooring. The roof is insulated. Then a sheet of material is cut out according to the outer size and the roof structure is sewn up. It is worth remembering that the top sheet of OSB should protrude beyond the booth - from the sides by 10 cm, from the front by 25 cm. The roof is fixed on hinges on one side, roofing material is laid on top. - Finishing
The booth is almost ready, it remains to finish. To do this, the bottom of the booth must be sheathed with roofing material with a bend on the walls to prevent wetting and rotting. Treat exterior walls with an antiseptic. With the help of platbands, veneer the manhole. - Kennel installation
Once the design is ready, you should install it in a pre-prepared place. To do this, choose a flat hill next to the house and with a good view.

 floor construction


Interesting! Shed roof booths are much simpler and lighter in weight, but the usable space in them is less than that of the same structures with a roof on two sides.
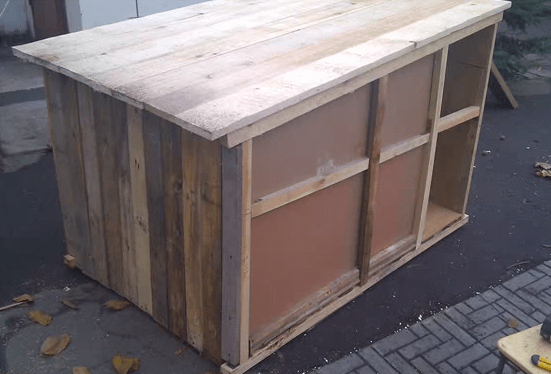
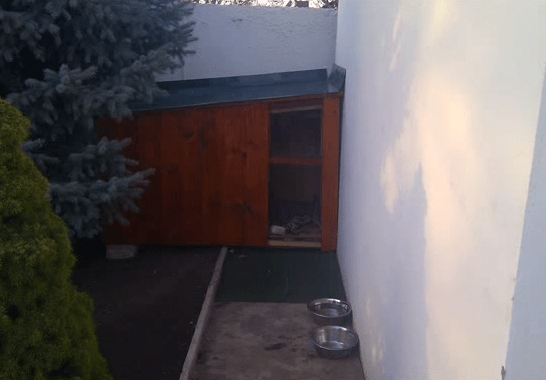
Photo of a typical, comfortable kennel for a dog:
gable
Are you planning a booth? big size, then it is simply necessary to install a gable roof. The disadvantage of such a design is that they have a high specific gravity - it is very problematic to drag and raise such booths when cleaning.
Step-by-step instructions on how to make a gable house:


 “I told you, master, put a single-sided one!”
Warm for the winter
You understand, if the dog house is on the street - it needs to be made warm! How to insulate the booth? For the construction of a winter insulated kennel, in addition to other materials, it is necessary to prepare a heater. The cheapest is foam.

How to make a warm kennel (with drawings):

The construction is completed, it remains only to install the insulated structure in place.
Photo of a booth insulated according to all the rules:
What can and cannot be insulated?
When choosing a heater, do not forget that the dog relies on his instincts. It is impossible to tell her that the rug cannot be gnawed, or the canopy covering the hole should not be torn off.
Consider several options for winterizing a booth for a dog, their pros and cons:
- the first thing to remember is that the insulation must be closed on both sides, otherwise the dog will simply tear it apart;
- if mineral wool is used for insulation, then perlite should be laid between the wall and the heat insulator. It will not only retain the properties of cotton wool, which is able to absorb moisture and lose its properties, but also protect Airways dogs from irritation;
- the canopy should be chosen from a dense and durable material, otherwise your pet will quickly break it;
- if possible, the insulating material should be natural.
Electric heating
You can perform forced insulation if you conduct wiring to the booth. A warm booth with heating (for example, a rug) has advantages:
- the temperature in the kennel is constant, even in extreme cold;
- electric heating dries the air in the structure, which is important.


But there are also disadvantages that cannot be ignored:
- The dog is an active and curious animal, and can get to the electric heating elements. There is a risk of electric shock.
- With constant dampness, a short circuit may occur.
- You can try and protect your dog from these troubles, but then the cost of the kennel will increase significantly.
Felt
The simplest and most inexpensive insulation that can be installed in a matter of hours:
- Cut out elements of the desired size with a clerical or construction knife;
- Secure the material from the inside of the kennel with a stapler and staples.


The result is high-quality insulation with natural material, which is not afraid of wind and frost. An important point is that this heat insulator has a high vapor permeability.
Mineral wool
It is better not to use this heat insulator, since for high-quality insulation it will be necessary to build a structure with thick walls, while it will be necessary to equip a vapor barrier. It is also worth noting that mineral wool has the ability to settle and get wet at high humidity, and from this its insulating ability is almost halved.

Styrofoam
This thermal insulation material has many advantages:
- provides high-quality insulation of the structure from the cold from the outside;
- the material does not absorb moisture, does not shrink over time, and its properties will not be lost over time;
- it is not difficult to insulate the booth, it is enough to cut out the heat insulator boards and install them. In this case, it is not necessary to use a vapor barrier.
improvised means
But you can insulate the structure with improvised materials, such as old sweatshirts or a blanket. Warming will turn out no worse than with the above methods. The only downside is that this isolation is short-lived, and rodents can start in quilted jackets.
Or just invite a cat 🙂 :  In the cold, no time for disagreement!
Photos of beautiful
If the site is designed in accordance with the rules of landscape design, then a simple dog house knocked together from boards may not fit into general form. By constructing a structure with your own hands, you can turn on the artist's imagination and decorate the house for a four-legged friend. To do this, you can use both improvised materials and woodcarving.


Useful construction video
Learning to build from video:
Conclusion
As you can see, there is nothing difficult in creating a house for your beloved dog. You can build a standard design or develop your own individual project, which will decorate the site. Share your experience with us, maybe someone on the site has a real work of art. Describe your experience in creating a dog kennel in the comments. We'd love to see photos of your pets.
The main stages of building a booth for your pet are choosing the optimal size, selecting materials and assembling. All work can be completed in one day, which will help our detailed instructions indicating all important points. It can be difficult to measure a dog, especially if it is overly active.
Design choice
The design of the booth can be one-volume or with a vestibule. The second option is preferable - the vestibule prevents the cold wind and draft from blowing into the sleeping area. The zones are separated by a partition with a passage or a curtain.

The ceiling needs to be removable. This will allow, if necessary, to open the kennel for cleaning or to provide the animal with veterinary care. The roof can be single-pitched or double-pitched. From a practical point of view, there is no difference. A shed roof is easier to make, and the advantage of a gable roof is the extra storage space for dog toys.

Determining the size of the booth
The dimensions of the booth must correspond to the size of the dog and climatic conditions. The dog should easily turn inside, lie freely and roll from side to side. But at the same time, the booth should not be very spacious if it is used in winter. In severe frosts, a large space is more difficult to warm up, the animal will freeze.
The calculation of the dimensions of the kennel is carried out according to the following measurements:
- Width (bed) - the length of the dog from nose to tail. If the kennel is divided into a vestibule and a sleeping place, then the size increases in accordance with the animal's complexion by 400-600 mm.
- The height of the booth is the height of the dog in a sitting position plus the thickness of the litter plus a margin of about 10 cm. The dog should sit without touching the ceiling, but walk inside with its head bowed.
- The depth of the booth is the length of the dog lying on its side with legs stretched forward from the tips of the paws to the withers plus a margin of 10 cm.
- The height of the manhole is the height at the withers minus 5-8 cm.
- The width of the manhole is the width of the chest plus 5-8 cm.

If you still have a puppy, then in building a booth you should be guided by the breed. According to the size of the dogs, they are divided into three groups, respectively, and the recommendations for the dimensions of the booth for them differ:
- Small breeds (poodle, dachshund, pug, cocker spaniel, etc.). The height of the booth is taken 600 mm, width and length - 700 and 550 mm.
- Medium breeds (Doberman, Bobtail, Bull Terrier, etc.). Their height at the withers reaches 40-57 cm, so the height of the kennel is up to 800 mm. Dimensions - 1200x750 mm.
- Large breeds(shepherd dogs, mastiff, dalmatian, etc.). Their height at the withers is more than 75 cm, so the booth should be spacious enough. Height 950 mm, width and length - 1400 and 1000 mm.
Selection and preparation of materials
The ideal solution for construction is softwood.
- The frame will require pine bars 100x50 and 50x40 mm.
- The inner lining is made of wooden lining or moisture resistant plywood.
- The junction of the wall and floor sheathing is closed with a board or plinth around the perimeter.
- The outer skin must withstand precipitation and prevent blowing. Suitable lining, block house, plastic eurolining, fiberboard, covered with waterproof paint.
- The floor is solid, without holes and slots. A grooved floorboard will do.
- For the ceiling, you will need 40x40 mm bars and a sheet of plywood. If the ceiling is insulated, then two sheets of plywood are taken, between which mineral wool or polystyrene and glassine are laid.
- The roof frame is made of bars 40x40 mm. It is sheathed with glassine, and a lining is attached on top. To protect against bad weather, the roof is covered with roofing felt, shingles or other waterproof material.
- Insulation: mineral wool, polystyrene foam or sawdust mixed with clay.

The work will require:
- antiseptic impregnation;
- galvanized nails;
- saw;
- hammer;
- screwdriver;
- self-tapping screws;
- stapler and staples;
- pencil and tape measure;
- level and building corner.
Base and frame
Cut two beams 100x50 along the length of the booth, between them along the edges two more beams are laid in the depth of the booth. A dovetail connection would be ideal, but a half-tree joint is enough when a cut is made on top of the side bars and a lower groove on the longitudinal ones. Fix the connection with galvanized nails or hardened self-tapping screws.

In the place where the partition will be installed, a 50x40 timber is attached, which is inserted into the grooves on the base. Additionally, a jumper should be installed in the middle of the sleeping chamber.
From below, the frame is hemmed with roofing material and glassine. You need to fix the filing with two longitudinal bars in the overlay to the transverse bars of the base. They will provide ventilation of the bottom of the booth and a gap between the booth and the ground.

Lay the insulation tightly and cover with another layer of glassine on top. Next, lay the floorboard with the lock, fixing it to the base with self-tapping screws.

In the corners and on both sides of the manhole, vertical racks of 50 mm timber are installed along the height of the booth minus 50 mm. Under the partition, it is better to install a beam 100x50 with the wide side along the jumper so that it goes inside the booth. Fasten the bar to upper bound hole between the posts.
Prepare a 50x40 timber frame for the upper part of the walls, along with a lintel for the partition. Connection in half a tree. Install and fix it on vertical racks.

Fasten the vertical post in the partition, stepping back from the edge to the width of the main hole, forming a passage.
Walls
The frame is sheathed with sheets of plywood or dense moisture-resistant OSB, forming the inner surface of the booth from the inside. Cut a hole for the manhole. Sheathe the partition, leaving a passage from the side of the main chamber of the booth.

Lay glassine on the outside in the resulting niches and secure it with a stapler. Place the insulation tightly and cover it with another layer of glassine. From the outside, close the booth with clapboard, moisture-resistant plywood or OSB.

Roof
For the roof, a frame of 40x40 mm timber and gables are prepared separately. For a shed roof, the gables are a right triangle. Racks on one side to the height of the roof from timber and logs across the entire width of the frame.

For two slopes, a central rack is installed along the long side of the frame and logs on the sides.

Close the resulting planes with sheets of plywood, and preferably with lamellas, with a gap of 3-4 cm. Lay roofing material on top of it with at least 5 cm at the edges and any available roofing material.
Hem the roof from below with glassine and insulate. The insulation layer is closed with glassine and hemmed with plywood or clapboard. In plywood, pre-drill ventilation holes in a checkerboard pattern or in rows with a distance of about 10-15 cm.

The roof is attached to the canopies to the main frame of the booth.
Booth installation
For the booth, look for a flat place on the rise so that the view from it falls on most of the yard or farm. If there is no natural rise, then form an embankment of crushed stone of a large, and after a small, fraction. Smooth pebbles would be preferable. Most of the time, the booth should be in the shade, but you should not additionally shade the space around it.
You can build a comfortable kennel for a dog from simple materials in a matter of hours. It is very important to choose the right size of a dog's home so that the home caretaker feels comfortable at any time of the year. In addition, a do-it-yourself dog house can become an additional decoration of the site if you use the original design and decorate it correctly.
Drawing up a drawing of a booth

To properly make a booth, you need to decide on its shape and size. Do not build too complex a structure: the presence of extra partitions, ladders, ledges and similar elements will greatly interfere with the dog. The best option is a rectangular kennel with a side entrance and a shed roof, where a pet can bask in the sun. It is desirable to make the roof or one of the walls removable, which will allow you to easily and quickly disinfect the booth.

The dimensions of the booth must correspond to a particular dog, therefore, when drawing up a sketch, be sure to take measurements: height at the withers, length from nose to tail, width chest and the height of the dog.

Based on this, you can determine the parameters of the frame:
- the width and height of the booth is equal to the height of the dog + 5 cm;
- the depth of the booth is 5 cm more than the length of the animal;
- the width of the manhole corresponds to the width of the chest + 5 cm;
- the height of the manhole is 5 cm more than the height of the dog at the withers.
To calculate the parameters of the booth for a puppy, you must use data from specialized reference books. So, an approximate design drawing is drawn on paper, all the necessary measurements are transferred to it. It remains to decide on the materials for the booth. Most often, dog houses are made of wood; this material is the most environmentally friendly, easy to use, inexpensive. The use of conifers is especially recommended.
Tools and materials for work

In order not to be distracted during the construction process, everything you need to prepare in advance:
- dry timber 100x100 and 100x50 mm;
- edged board 25 mm thick;
- lining for sheathing;
- sheet of plywood or chipboard;
- bars 40x40 mm;
- Styrofoam;
- ruberoid;
- glassine;
- sand;
- galvanized nails;
- door hinges;
- hammer.
Boards and bars should be thoroughly cleaned before assembly, otherwise the dog may sting its paws. But it is better to treat wood with impregnation at the end of work, and only from the outside: extraneous odors cause irritation in animals, so the dog may refuse to enter the booth.
Prices for different types of building boards
Building boards
Video - What should be a doghouse
Assembling a shed roof
Most dogs like to lie on top of the kennel, so houses with a shed roof are more convenient for them. The roof should be slightly sloped and always open - this design simplifies the cleaning and disinfection of the booth. To protect the pet from the cold, the house should be carefully insulated, and it is better to do this immediately, at the assembly stage. For the same purpose, it is recommended to place the hole on the wide side of the booth with an offset to one of the corners. So the room will not be blown and the dog will have a cozy and warm sleeping place.
Step 1. Making the bottom frame


Bars 40x40 mm are cut along the length and width of the bottom, laid on a flat area or on a table, connected with self-tapping screws into a rectangle. If the animal is large, the frame is additionally strengthened with one or two crossbars made of timber. After that, the frame is sheathed with boards on one side.
Step 2. Floor insulation
The boarded frame is laid so that the bars are on top. They line the inner surface with glassine, attach it with stapler staples, and then cut the foam to the size of the frame and place it tightly between the bars. The height of the insulation must correspond to the height of the bars. From above, the foam is covered with another layer of glassine and the finishing floor is stuffed.
Step 3. Assembling the frame of the booth
A beam of 100x100 mm is sawn into 4 parts: 2 segments are equal in length to the height of the booth, 2 are 7-10 cm longer. These bars must be fixed in a vertical position at the corners of the bottom. Racks of greater length are installed in the front, and those that are shorter in the back. This is necessary to form the slope of the roof. Each bar is leveled and fixed with nails or self-tapping screws. Additionally, vertical bars are stuffed in the center of the walls and 2 smaller bars on the sides of the manhole. At the internal joints, metal plates are used to strengthen the frame.
Step 4. Wall cladding
The finished frame is sheathed with clapboard on the outside, and insulated from the inside: first, the walls are covered with glassine, fixed with a stapler, and then the space between the bars is filled with mineral wool or pieces of foam. From above, the insulation is covered with another layer of glassine, on top of which plywood, chipboard or other similar material is stuffed. Fasten the sheathing with galvanized nails small sizes, carefully sinking the hats so that the dog does not get hurt.
Step 5. Making the roof
For a shed roof, you will need an OSB sheet and 40x40 mm bars. A frame is knocked down from the bars according to the size of the inner perimeter of the kennel. A piece of the same size is cut out of OSB and stuffed onto the frame. Styrofoam is tightly laid between the bars, covered with a film, fixed with a stapler around the perimeter. Next, they take a larger sheet of plywood and lay it on top so that it overlaps the lower frame by 10 cm at the back and sides, and protrudes 15-20 cm from the front. This is necessary to protect the walls and the manhole from rain. Instead of plywood or OSB, you can take boards 20-25 mm thick. The finished roof is attached to the booth with the help of hinges, and roofing material or is stuffed on top.
Step 6. Finishing
The finished structure is treated from the outside with a conventional antiseptic or special impregnation, dried well. Then roofing material is nailed to the bottom, bending the edges by 5 cm onto the walls, and two bars 100x50 mm are attached to the roofing material. The bars are also carefully covered with a primer mixture. The booth is turned over again, the manhole and the ends of the crate are decorated with wooden platbands.
Step 7 Installing the Booth
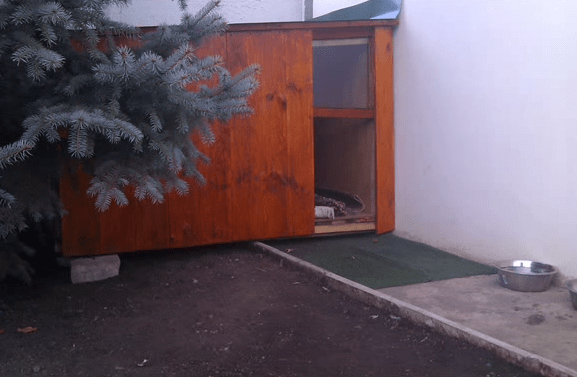
The booth is ready, and now you need to choose a suitable place for it. It should be a dry, flat area, close to a residential building, closed from the wind. It is advisable to choose a well-lit place next to some kind of canopy or tree so that the animal can hide from the heat. Of course, the dog must have an excellent view from its place in order to notice strangers in time.


Gable roofs are best done on small booths, since it is not very convenient to lift heavy structures during cleaning.

Step 1. Assembling the frame
From 4 bars 50x50 mm, the bottom frame is knocked down according to the drawing. In the corners, vertical racks are nailed along the height of the booth, they are connected by an upper trim of the same bars. To strengthen the frame, additional jumpers are stuffed on the bottom and on both sides of the manhole.


Step 2 Fixing the roof


Two identical bars 50x50 mm are connected to each other at an angle of 40 degrees. Then they make another exactly the same blank. They are installed on top of the frame of the booth flush with the walls, leveled vertically, baited with nails. From above, both gables are connected with a longitudinal bar, which should protrude 20 cm forward on one side. Cut off 2 more bars of the same length and stuff them on the lower ends of the rafters.
Step 3. Sheathing the booth

The finished structure is sheathed with clapboard from the outside. The boards should fit snugly against each other so that there are no gaps. The bottom is additionally upholstered with roofing material, if necessary, support bars are attached.
Step 4. Warming

From the inside, the frame is lined with glassine, which is fixed with a stapler in the corners, after which foam plastic or mineral wool is inserted. Next, the insulation is covered with glassine and stuffed with plywood on the walls and floor.
Step 5. Roof sheathing

The roof frame is removed, sheathed with plywood from the inside, then turned over, glassine is attached over the plywood. The space between the bars is filled with insulation, covered with glassine on top, and then screwed with self-tapping screws. A skate is mounted at the junction of the slopes, the front edges are closed with end strips. To make it convenient to remove the roof, a nail is driven into the ends of the corner posts, the hats are ground off. Holes are drilled in the beams of the gables according to the diameter of the nails and then the roof is simply put on.
Booth with a vestibule

To make the dog's home more comfortable, you can build a booth with a vestibule. This is a design consisting of two compartments: the far one is a sleeping place, and the near one protects from drafts and cold. They are separated by an insulated partition with a manhole.
Prices for lining, timber imitation, block house
Clapboard, timber imitation, block house
Video - Insulated booth with a vestibule
Don't make the bed too big - dogs usually sleep curled up. But the dimensions of the vestibule should be such that the dog can freely stretch out to its full height, and also easily pass through the hole and turn around in the booth. The assembly of the kennel with the vestibule is carried out as standard; the only difference is the partition: for its manufacture you will need 40x40 mm bars, a piece of plywood, insulation and self-tapping screws. From the bars make a frame along the width and height of the interior. Plywood is cut into two parts; one part is nailed to the frame, insulation is inserted between the planks, covered with the second part of plywood. In order for the partition to be freely removed, two wooden slats are taken and, using a cutter, longitudinal grooves are selected in them for the thickness of the partition. Then they are screwed to the walls of the booth and a partition is inserted.
Video - Do-it-yourself dog house


If you are going to get a dog or you already have a pet, then your four-legged friend needs his own corner in which he will rest, hide from the weather and keep warm on a cold winter night. The article tells about the options for making a booth for a dog - its dimensions, materials used, construction stages, drawings. Examples of beautiful and practical finished designs are given - interesting ideas for design.

The dog house is her home, which will protect the animal from the weather and allow privacy, and it must be reliable. Source fanvid-recs.com
Kennel dimensions
First you need to decide on such parameters of the kennel as its width, height and depth. The size of the dog house depends entirely on the size of your pet. If the kennel is small, then the animal in it will be stuffy and cramped, and if vice versa, then it will be cold. To determine the depth, you need to measure the distance from the dog's nose to its tail. To determine the height, measure the height of the animal at the withers and add 5 centimeters to the result. The height of the manhole is made 5 centimeters larger, and to determine its width, the dog’s chest is measured and 5 centimeters are added to the resulting figure.
The image clearly shows how to take measurements correctly, as well as booth sizes for some breeds of dogs.

The size of the booth directly depends on the size of the future owner of the house. Source heaclub.ru
Material selection and insulation
In most cases, the dog house is made of wood, as it keeps cool in the summer heat, and warm in the winter cold. Especially if you fit wooden boards closely without gaps and cracks. In addition, the tree is absolutely harmless material. A high-quality doghouse made of timber will last at least 6-7 years without losing its appearance.
Booths made of brick and concrete are far from the best option. They, of course, conduct heat well, but in summer they are unbearably hot and cold in winter. And most often, animals prefer to sleep in the open air than in such a kennel.
To save money, you can choose a kennel made of plywood and fiberboard. But since plywood is thinner than wood, building a warm dog house will require more than one layer of material.
For insulation, foam, mineral wool or other suitable material is usually used. The main thing is not to overdo it when insulating with foam, as it is airtight. Due to the lack of fresh air, the dog will not want to be in such a kennel, especially if you curtain the hole. In addition, do not forget that the floor and roof of the booth must also be insulated. But even here the layer of insulation should not be too large. To prevent wind from blowing into the kennel in winter, a dense fabric, cut into wide strips, is nailed over the manhole.

An example of a booth with an attached "dining table" Source zen.yandex.ru
On our website you can get acquainted with the most - from the construction companies presented at the exhibition of houses "Low-Rise Country".
roof type
The roof in dog kennels is gable or single-slope. A kennel with a shed roof is more popular, as dogs are very happy to sit on it. In addition, the smaller the area of \u200b\u200bthe room, the faster the air heats up in it. And given that there is no heating in the kennel, and the air is heated by the heat generated by the dog's body, it will be warmer in such a booth in winter. Wood is used as the material. Roofs made of metal materials are not popular, because in the heat it heats up, and in the cold it does not retain heat at all. The roof slope is installed in the opposite direction from the entrance. This is done so that during rainfall water does not enter the kennel. The angle of inclination of such a roof should be at least 5-10 degrees.
Also, sometimes a ceiling is built in the booth, and a gable roof is on top. In addition, then it is possible to make it removable or equip a closet in it. It will be possible to store your pet's toys in it, and such a structure will simplify cleaning and disinfection. Such a trick is used by those who outwardly do not like shed roofs at all. The angle of inclination of a gable roof can vary from 5 to 60 degrees.

Booth with a gable roof made of wood for a small dog Source selogni.ru
Step-by-step assembly of a kennel with a shed roof
The base for the floor is knocked together from the bars on a flat surface and the resulting frame is sheathed with boards or plywood sheets.
Next, you need to turn the assembled structure over with the bars up and tightly lay the foam or mineral wool between them. The thickness of the insulating material will depend on the parameters of the wooden bars. Next, the frame is covered with boards and firmly fixed with self-tapping screws. The floor for the booth is ready.
For the next stage, you need to take 4 bars measuring 10 by 10 centimeters, the lengths of 2 of them will be equal to the height of the kennel, and the other 2 - 10-12 cm longer than the previous bars. They are installed at the corners of the base, short on one side and longer on the opposite side. This arrangement of bars is necessary for the formation of a roof slope. Additional bars are installed between the corner ones in the center of each of the walls, as well as on both sides of the future manhole. To fix the bars, corners and self-tapping screws are used, and to check vertical position bars - level.

Approximate dimensions of the booth with a shed roof: the back is lower than the facade Source abpolar.ee
On our website you can find contacts of construction companies that offer construction services not only for country houses, but also for any associated turnkey buildings. You can directly communicate with representatives by visiting the exhibition of houses "Low-Rise Country".
For sheathing the outer surface, lining or plywood is used. The walls are insulated in the same way as the floor of the kennel. At this stage, special attention should be paid to ensuring that there are no protruding nails or self-tapping screws inside the booth, otherwise this may harm the health of your pet.
The roof is built in the same way as the base of the booth. But there is one difference, the size of the roof should be slightly larger. The resulting design is installed on the booth and fixed. To ensure water resistance, the roof is covered from above with slate or roofing material.
Outside, the surface of the kennel is treated with impregnation, inside this can not be done so as not to harm the health of the dog. The floor is covered with ruberoid.
The booth is installed on a well-lit, flat place with a large view next to the house.

When installing a booth, you need to remember that it must be protected from drafts. Source orgtorg.org
Step-by-step assembly of a booth with a gable roof
For the construction of the floor frame, 4 bars are used. Further, 4 more bars with a length equal to the height of the booth are vertically driven in at the corners. At the end of this stage, the vertical poles are connected with 4 more bars.
To build a gable roof, rafters are used. To do this, take 2 wooden bars and fasten them together at an angle of 40-45 degrees. According to this principle, 2 rafter legs are made, which are fixed on both sides of the booth. Then they are connected to each other by a ridge run, which should protrude 20 cm in front of the kennel. In order to better understand the device of a gable roof, use the drawing.

Drawing of a gable roof. 1 - rafters; 2 - transverse fastening; 3 - Mauerlat; 4 - ridge run. Source selogni.ru
Just as when assembling a kennel with a shed roof, lining or plywood is used for sheathing, and the floor is covered with roofing material. If necessary, bars can be used for the stand.
To cover the roof, it must be removed and the inside covered with plywood. Then the roof is turned over, and glassine is fixed on top of the plywood, on which heat-insulating material is laid. In order for the roof to be easily removed and put in place, recesses for nails are drilled in the gables.
To make the roof of the booth waterproof, its surface is covered with roofing material.

Drawing of a booth for a dog with a gable roof Source selogni.ru
Building a brick booth
A brick booth is distinguished by its strength and durability. This kennel is suitable for a large dog. The material for the construction of such a booth can be cinder blocks, bricks and foam blocks. Stages of building a brick kennel:
First you need to clear and level the area under the booth. Then they dig a trench under the foundation of about 250x250 mm, which is poured with concrete and left for several days.
When laying out the walls, it is necessary to carefully monitor the level and observance of right angles in the structure. For the manhole, the required number of bricks is passed in width. When the masonry reaches the height of the manhole, a wooden beam must be laid across. On top of it, they continue to lay out bricks already solid.
To insulate such a booth inside, its walls and floor must be upholstered with wood.
A wooden floor is installed on the roof and a slate roof is installed on it.
Double kennel
A dog house for two dogs is a great option for owners of two pets at once. It implies 2 separate "rooms" under one roof. Most of these booths are one-story with 2 different entrances. Inside, the oblong kennel is divided in half with a vertical partition. In general, the assembly and insulation of such a booth is not much different from a conventional kennel.

The “house” for two owners is assembled in the same way, but there is a partition between the two “rooms” Source selogni.ru
Beautiful and original booths for dogs: examples in photos and videos

A small castle can “settle” on the site Source pinterest.com

For lovers of fairy tales - a house for gnomes Source pinterest.ca

Modern "mansion" for a pet with panoramic windows Source selogni.ru

Stone "house" with doors, a window and a street lamp Source selogni.ru

Even doghouse can become a flower bed Source pinterest.com


So that the pet is not offended that his house is worse than that of the owner, you can build him the same in miniature Source: dobrzemieszkaj.pl

If a wooden barrel is “lying around” in the bins, and it can become a home for a dog Source selogni.ru

Two-story "cottage" with a balcony and stairs Source www.wideopenpets.com

You don’t have to go to Spain, but create it in miniature on your site. Source selogni.ru

You can also make a house for privacy for your pet - the frame of the old TV will do just fine Source pol-master.com

Full-fledged house with windows and a gable tiled roof Source newsi-n.org

A plastic “yurt” may be suitable for summer holidays, but it is better to put it in the shade. Source selogni.ru
Video description
Booth as art: in the following video, see some more examples of unusual dog houses:
Conclusion
A dog house is not necessarily a boring box in the middle of the yard; an unusual design made by experienced hands can become a masterpiece and decoration of a country house plot.
Many people dream of having a dog as a child. But in a city apartment there is not enough space for her, but a country house gives the opportunity to finally realize her childhood dreams. It will be spacious enough even for a large dog. The dog that will live here will become not only a watchman and reliable guard of the site. He will be a true friend. The main advantage of a dog is that it loves its owner for who he is, without demanding a reward for his affection. But friendship requires mutual care and attention. A good owner will not leave his faithful dog without a comfortable home. Do-it-yourself dog house - the most the right way show concern for your friend.
- The kennel should not be blown by the wind, so the most frequent wind direction must be taken into account.
- The place for such a dwelling should be bright, but within reach for the dog there should be a shaded area where the animal could hide in the heat.
- It is better to place the booth in a dry place - on a hill, so that water cannot accumulate under it.
- The kennel is placed near the entrance to the residential building, on the south side.
- From his observation post, the dog must see the main part of the site and the entrance gate (gate).
The last principle of site selection requires special explanation. Owners of dogs whose pets live with them in city apartments know that the dog always tries to find a position in which he has the maximum view. Even if it sometimes interferes with the owner, who believes that the dog is simply getting under his feet. The centuries-old instinct of the guard makes her choose the best place to protect the owner.
The booth is best located in a dry place and on a hill

From his observation post, the dog must see the main part of the site
Stages of building a dog house
A winter warm booth for a dog is not always needed, even if it is located on the site in winter. It is better to make a universal kennel that can be operated in both warm and cold seasons. Such a booth should consist of two parts - a vestibule for the entrance and a sleeping place, where the dog will not be afraid of any cold.
Preparation of the necessary material
When deciding how to make a dog house, do not complicate yourself and your faithful dog a life. It follows from his understanding of comfort, and not your boundless material possibilities. Dogs do not need stone palaces, artificial lighting and vinyl siding.

Particularly loving owners build entire castles for their pets

The animal will experience discomfort in such dwellings.

There should be no protruding knots or protruding chips on the surface of the tree.
Ordinary softwood is the best material for a dog house. It is breathable wood that can provide the air circulation necessary for the dog and, therefore, the microclimate he needs. The tree that forms the basis of the booth must first be prepared: cleaned so that the animal does not get hurt and does not hurt its paws.
Note that the service life of coniferous wood is 7-8 years. After this period, it is necessary to check the structure for strength and replace failed elements in time.
Building may require:
- bars of the following sizes (in mm): 100x100, 40x40, 100x50;
- lining;
- plywood;
- batten;
- decorative slats;
- ruberoid;
- mineral wool or polystyrene;
- bituminous tiles;
- glassine;
- polyethylene;
- tarpaulin;
- galvanized nails;
- pinoteks;
- antiseptic impregnation type "Senezh";
- sand.
The inside of the booth does not need to be treated with antiseptics and other odorous substances. Remember that dogs have a finer sense of smell than humans. For us, a foreign smell may be imperceptible, and it will torment and annoy the dog.
Determining building parameters
Of great importance are the size of the booth for the dog. In a too spacious kennel, it will be cold in winter, and in a cramped one, neither lie down nor turn around. Therefore, we will build a kennel based on the individual parameters of our dog.

For each dog, it is better to make a booth of an individual “cut” - it is necessary to calculate the optimal dimensions
We take measurements and immediately do the calculation:
- The height of the booth is determined based on the height of the animal at the withers with the addition of the thickness of the expected bedding and another 10-15 cm. The dog must move around the booth, bowing his head, and sit in it without touching the ceiling.
- The depth of the kennel should allow the animal to lie on its side with legs extended. To determine this parameter, you need to put the dog down and measure the distance from its withers to the tips of the front paws, add 10-15 cm.
- The width of the dwelling is the total width of the vestibule and the dog's bed. The bed can have a width that is 10-15 cm greater than the distance from the dog's nose to the base of its tail. The width of the vestibule is determined depending on the build of the dog. It should be comfortable for her to get in and out of the booth. Sometimes the tambour is made more than a sleeping place, because here the dog can lie on its side in summer, and in winter it will rest in a sleeping place, curled up.
- The height of the entrance hole (manhole) is 5-9 cm less than the height of the dog at the withers.
- The width of the hole should be 5-8 cm wider than the dog's chest.

The scheme of the booth for the dog is needed after the owner has finally decided on the parameters of the future building. Having such a drawing, it will be easier to calculate the need for materials so as not to purchase anything extra
Description of the build process
So, putting together a booth for a dog is not so difficult if all the necessary tools and material are at hand. Here is a sample list of jobs:
- Bottom and frame. We assemble the frame for the bottom from 40x40 bars, after which we nail the floorboards, trying not to leave gaps so that it is warmer. If the dog is heavy, you can additionally strengthen the floor with 40x40 bars so that it does not sag. At the corners of the finished bottom, we vertically fix the bars 100x100. They will become the basis for the walls. Now the design resembles an inverted table. Between the main bars, perpendicular to the bottom, we install bars 40x40. They will support the roof, reinforce the walls and mark the entrance.
- Walls. For sheathing the outer part of the booth, it is better to use lining, which, unlike plywood, will not delaminate over time. We fix the sheathing with galvanized nails with small caps.
- Ceiling. If the booth is to be located in an aviary or under a canopy, then you can get by with such a ceiling, which is also a roof. If the kennel does not have any additional weather protection, you need to make the ceiling and the roof separately, leaving a space between them - the "attic". For the ceiling you will need plywood in size and bars 40x40. How to insulate a dog house? It is insulated with mineral wool or foam plastic, laid with glassine. From above strengthen the second sheet of plywood. It is better to make such a ceiling removable in order to be able to clean the booth and provide veterinary care to the animal. If there is no additional roof, the ceiling is covered with roofing felt and shingles.
- Waterproofing and insulation. Turn the structure upside down. We treat it with antiseptic impregnation, cover it with roofing material and nail additional 100x50 bars on top of it, which we also impregnate with Senezh. We turn the structure over again, line the bottom with glassine, then put the insulation and glassine again. Laying the clean floor. Similarly, we insulate the walls and sheathe them from the inside with clapboard. We make a frame for the manhole and a threshold.
- Roof. Initially make the gables of the roof. For the perimeter, bars 40x40 are needed, glassine is attached from the inside, and the structure is sheathed with clapboard on top.
- Laz. It is recommended to close the inlet with a tarpaulin curtain. So that it does not open from the wind, you can sew small polyethylene pockets on it below from the inside, into which you can pour sand.
Outside, the booth can be covered with Pinotex. This will extend its service life and give the product a pleasant aesthetic appearance.

It is simply necessary to use antiseptic and waterproofing impregnations, otherwise your booth will have to be rebuilt in a year

You can use glassine as a heater, or you can use any other material that you prefer.

The crate of the lining is covered with roofing material and shingles - this is the easiest and cheapest option
Dog kennel care
Now that we know how to build a dog house, all that's left to do is figure out how to take care of the dog house.

The ceiling can be made removable to be able to clean the booth and provide veterinary care to the animal